 I considered making focaccia, but I'd already made the dough for Light Whole Wheat Bread from Artisan Bread in Five Minutes a Day. Oops. I went through with the remainder of the instructions anyway, and the result turned out pretty well, though with a harder crust than I expected, so I'm not comfortable calling it focaccia. Taking 1lb of your typical bread dough, preheat the oven to 425F. Grease the bottom of a baking sheet with olive oil. Make a round dough, then roll it out to about 3/4in thickness. Sprinkle a pinch of salt and 1 Tbsp dried rosemary on top. You can also add some lightly sauteed onions, or in my case, sliced olives (I love olives). Drizzle the top with some olive oil. Pop into oven and pour 1 cup hot water into a broiler tray, then quickly close the oven to seal in the steam. Bake for 25min, adjusting for thickness of dough.
Showing posts with label breads. Show all posts
Showing posts with label breads. Show all posts
Monday, April 12, 2010
Rosemary Flatbread
I considered making focaccia, but I'd already made the dough for Light Whole Wheat Bread from Artisan Bread in Five Minutes a Day. Oops. I went through with the remainder of the instructions anyway, and the result turned out pretty well, though with a harder crust than I expected, so I'm not comfortable calling it focaccia. Taking 1lb of your typical bread dough, preheat the oven to 425F. Grease the bottom of a baking sheet with olive oil. Make a round dough, then roll it out to about 3/4in thickness. Sprinkle a pinch of salt and 1 Tbsp dried rosemary on top. You can also add some lightly sauteed onions, or in my case, sliced olives (I love olives). Drizzle the top with some olive oil. Pop into oven and pour 1 cup hot water into a broiler tray, then quickly close the oven to seal in the steam. Bake for 25min, adjusting for thickness of dough.

Wednesday, October 28, 2009
Chocolate Chip Banana Bread
This is a great chocolate chip banana bread recipe that I made recently. The bread is very moist and dense, so even a tiny square is filling. This recipe also has a LOT of chocolate chips, so its great if you're a chocoholic like me, or if you're planning to eat this for dessert instead of breakfast.
Directions: Mix together the butter and sugar. Add the egg and milk, and then the mashed bananas. In a separate bowl, mix the flour, salt, and baking powder. Add the dry mixture to the wet mixture. Stir in about a cup of the chocolate chips. Transfer the mixture to a lightly greased loaf pan (if you don't have that, a brownie pan works just as well). Top with remaining chocolate chips. Bake at 350 degrees for 40-45 minutes or until a toothpick comes out clean.
Ingredients:
1/2 cup (1 stick) butter, at room temperature
1 cup white sugar1 egg
1 tablespoon milk4 overripe bananas, mashed
1 and 1/2 cups all purpose flourdash of salt
1/2 tablespoon baking powder1 and 1/2 cups chocolate chips
Directions: Mix together the butter and sugar. Add the egg and milk, and then the mashed bananas. In a separate bowl, mix the flour, salt, and baking powder. Add the dry mixture to the wet mixture. Stir in about a cup of the chocolate chips. Transfer the mixture to a lightly greased loaf pan (if you don't have that, a brownie pan works just as well). Top with remaining chocolate chips. Bake at 350 degrees for 40-45 minutes or until a toothpick comes out clean.

Saturday, October 17, 2009
Popovers!
One of my favorite restaurants in Maine, the Jordan Pond House, is famous for their homemade popovers. Popovers are a light hollow roll that is made from an eggy batter. If done correctly, they "pop" up while cooking, leaving the middle of the pastry filled with air. They are delicious served by themselves with butter and jam, or they can be stuffed with ice cream or chocolate to make a dessert, or with fish or meat to make an entree. The last time I was in Maine I bought a popover pan and popover mix, and today I finally attempted to make them.
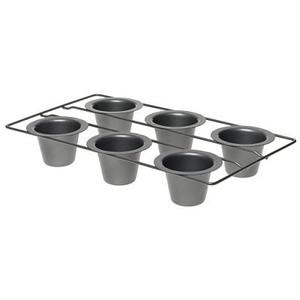
A popover pan is similar to a muffin pan, except the cups are a little deeper, and they are separated to give the popovers room to expand. In theory, popovers can be made in a muffin pan, but I highly recommend a popover pan if you've never made them before.
Making the batter was very easy. I mixed 2/3rds cup milk with one egg, and then folded in 2/3rd cup of the popover mix I bought. I don't believe the store-bought mix is essential; since the only ingredients in it are flour and salt. There were a few tips on the side of the popover mix that were very helpful, however.
First of all, the egg(s) should be at room temperature before you use them.
Second, you should use whole milk instead of skim or low-fat. This prevents the popovers from burning. I used skim because it was all I had, and the popovers did come out a little brown, so maybe next time I'll try to pick up some whole milk.
Third, you should chill the batter for 30 minutes before baking it.
Fourth, you should warm the popover pans in the oven for a few minutes before pouring the batter into them.
After chilling the batter, I preheated the oven to 450 degrees per the instructions on the mix, warmed the pans for a few minutes and filled each popover cup 1/3rd full. (The amount of mix I used made 4 popovers). The instructions said to cook the mix at 450 degrees for 25 minutes and then lower the temp to 350 and cook for an additional 5-10 minutes. However, after about 20-22 minutes at 450 my popovers had clearly popped and were looking nice and golden brown, so I took them out of the oven.
The fifth important thing to remember is not to open the oven door while baking! If you need to peek at them, use the oven light. The popovers will not rise correctly if you open the door.
My popovers turned out looking (and tasting!) absolutely delicious! The second picture shows the inside of the popover, nice and hollow! Definitely a successful experiment :)


A popover pan is similar to a muffin pan, except the cups are a little deeper, and they are separated to give the popovers room to expand. In theory, popovers can be made in a muffin pan, but I highly recommend a popover pan if you've never made them before.
Making the batter was very easy. I mixed 2/3rds cup milk with one egg, and then folded in 2/3rd cup of the popover mix I bought. I don't believe the store-bought mix is essential; since the only ingredients in it are flour and salt. There were a few tips on the side of the popover mix that were very helpful, however.
First of all, the egg(s) should be at room temperature before you use them.
Second, you should use whole milk instead of skim or low-fat. This prevents the popovers from burning. I used skim because it was all I had, and the popovers did come out a little brown, so maybe next time I'll try to pick up some whole milk.
Third, you should chill the batter for 30 minutes before baking it.
Fourth, you should warm the popover pans in the oven for a few minutes before pouring the batter into them.
After chilling the batter, I preheated the oven to 450 degrees per the instructions on the mix, warmed the pans for a few minutes and filled each popover cup 1/3rd full. (The amount of mix I used made 4 popovers). The instructions said to cook the mix at 450 degrees for 25 minutes and then lower the temp to 350 and cook for an additional 5-10 minutes. However, after about 20-22 minutes at 450 my popovers had clearly popped and were looking nice and golden brown, so I took them out of the oven.
The fifth important thing to remember is not to open the oven door while baking! If you need to peek at them, use the oven light. The popovers will not rise correctly if you open the door.
My popovers turned out looking (and tasting!) absolutely delicious! The second picture shows the inside of the popover, nice and hollow! Definitely a successful experiment :)


Tuesday, June 30, 2009
No-Knead Red Bean Paste Challah
 Whilst browsing through food blogs one day, I got to Steamy Kitchen's post on No-Knead Nutella and Roasted Hazelnut Challah and knew my browsing was over. It looked seriously delicious, and I've never tried making a bread on my own w/o the aide of a bread machine, so a no-knead dough seemed like the perfect introduction.
I made a few changes though, given the material I had on hand. I don't really like honey (and therefore never have any on hand), so I substituted equal parts sugar for the honey, which I expect drastically reduced the sweetness. I also had 1/4 cup butter and didn't feel like opening another package, so I substituted a bit less than 1/4 cup olive oil (about 3 Tbsp). I also skipped the egg wash, and I have to say, I really like the way it turned out without it.
The biggest change was that I used red bean paste instead of Nutella, since I almost always have some on hand. I do in fact have some leftover dough and plan on trying another loaf tonight. After trying this, there's one thing I can say for sure - next time I swing by a bookstore, I've already ordered the book she got the recipe from, Artisan Bread in Five Minutes a Day. I have to say, I was skeptical about rising dough in a fridge and making such a large batch in one go, but I'm now convinced it's nothing short of brilliant.
Saturday, June 20, 2009
Chocolate Chunk Banana Bread

I had some old bananas last week, so the logical step was to make banana bread! I modified this recipe.
Chocolate Chunk Banana Bread
3 very ripe, soft, darkly speckled large bananas, mashed well (about 1 1/2 c.)
2 large eggs, lightly beaten
1/4 c. plain yogurt
1/2 c. (1 stick) unsalted butter, melted and cooled
1 tsp. vanilla extract
1 1/4 c. walnuts, coarsely chopped
1-4 oz. Hershey Symphony chocolate bar, coarsely chopped
2 c. white whole wheat flour
3/4 c. sugar
2 tsp. baking powder
pinch of salt
1. Preheat oven to 350F.
2. Butter and flour an 8x8 baking pan.
3. Mix the mashed banana, eggs, yogurt, melted butter and vanilla in a large bowl.
4. Stir the walnuts and chocolate into the banana mixture (doing so will reduce the risk of over-mixing).
5. Sift flour, sugar, salt and baking soda into the banana mixture.
6. Mix gently with a wooden spoon just until the dry ingredients are moistened. The batter will be lumpy. DO NOT overmix!
7. Pour batter into prepared pan and bake for ~1 hr, or until a toothpick inserted into the center comes out clean.
8. Let the bread cool in the pan; slice and serve.
Sunday, April 19, 2009
Chhole-Bhatura and Aloo Shaak

Chhole is a dish of chickpeas in a tomato-based sauce, and it's traditionally eaten with bhatura, which is a fried bread made from white flour. A few weeks ago (I'm way behind on my posts too!) we made this dish with a simple potato dish. The chhole and potato recipes are direct rips from my mother's recipes. We never really made bhatura at home (my mom generally made poori instead, which is fried, unleavened bread made with whole wheat flour) to eat with these dishes. Additionally, we'd usually eat them with shrikand, which is a dish made by pressing the water out of yogurt and then adding sugar and saffron. But that process generally takes over a day so it didn't happen :)
The potatoes are made just like the aloo gobi from last month, omitting the cauliflower. I added a handful of defrosted frozen peas after the potatoes were done cooking to add some color.
The bhatura were made based off a recpie found here. The recipe turned out to make the dough waaaay too moist, so we ended up doubling the flour and the baking powder, and adding a few tablespoons of oil and water.
Chhole-Bhatura
yield: ~7 servings
For the Chhole:
4 small-medium onions, chopped
7 plum tomatoes, chopped
vegetable oil
1 tsp ginger paste
1 tsp garlic paste
3 green chilis, spliced once down the vertical center
1 tsp red chili powder
1 tsp turmeric
1 tsp cumin-corriendar powder
1/2 tsp garam masala
1 tsp ground black pepper
1 tsp salt
3 cans chick peas
For the Bhatura:
2 cups of white all-purpose flour
1 tsp baking powder
1/2 tsp salt
1 cup non-fat yogurt
Water
Vegetable oil (lots of it--for frying)
Coat a medium-sized frying pan in vegetable oil and place over medium-high heat. When the oil is heated, add the onions and stir until coated in oil. Cook the onions until translucent, about 5 minutes. Keep stirring occasionally and cover if necessary to keep from sticking. Add the garlic paste, ginger paste, and green chilis and cook for another minute. Then add the remaining spices and the tomatoes. Stir and cover. Reduce heat to medium and allow to simmer for about 5 minutes until tomatoes have reduced and the onions are cooked through. Remove from heat and allow to cool slightly. Remove the green chilis and discard. Place the onion-tomato mixture in a blender and puree. Return the mixture to the pan (or a saucepan) and add the drained chick peas. Cover and simmer on low heat for about 10 minutes to allow the chick peas to soften slightly and absorb some of the flavor.
To make the bhatura, sift together the flour, baking powder, and salt. Combine slowly with the yogurt and a few tablespoons of water and oil until a manageable dough forms. Set aside for 1-2 hrs in a warm place. Then break off small balls of dough (golf-ball-sized) and coat with more flour. Roll into circles about 2mm thick. Heat ~4 inches of oil in a thick-bottomed pot (eg the bottom of a pressure cooker or a wok). To test the oil, slide a tiny ball of dough (size of a whole black peppercorn) into the hot oil. If it sizzles and floats and cooks immediately, the oil is ready. Slide the bhaturas in 1-3 at a time (depending on the size of your pot). Cook on either side for a minute until golden brown. Remove from oil and drain on a paper towel.
Serve everything together warm, with yogurt. Make sure you eat the traditional Indian way--with your hands! :)
Subscribe to:
Posts (Atom)
