Sunday, October 25, 2009

Cheesy Pesto Chicken

If you're a pesto freak like me, you're going to love this easy, tasty recipe.

The steps are incredibly simple and the total prep time takes about 10 minutes.
Melt some butter in a bowl (I find about half a stick works well for a pound of chicken).
Dip slices of boneless, skinless chicken breast in the butter and then cover in bread crumbs.
Place the breaded chicken slices in a buttered casserole dish.
Spread pesto on top of the chicken pieces, and top with your favorite cheese (I like fresh mozzarella).


The chicken ready to go in the oven.


Bake at 350 degrees for about 45 minutes for thinly sliced chicken, even more for thicker chicken.
Cut into chicken to make sure it's done before serving, because ovens vary, and its hard to tell from the outside appearance if its fully cooked.


See? Totally simple, and totally delicious! The butter and the pesto keep the chicken nice and moist, and the pesto, cheese, and breading combine to give a delicious flavor!
This dish is really easy to make in large quantities, so its great for having friends over, or if you live alone (like me) to make on the weekend and then eat throughout the week.


Add some vegetables and bread for a very quick, very complete meal!

Saturday, October 17, 2009

Popovers!

One of my favorite restaurants in Maine, the Jordan Pond House, is famous for their homemade popovers. Popovers are a light hollow roll that is made from an eggy batter. If done correctly, they "pop" up while cooking, leaving the middle of the pastry filled with air. They are delicious served by themselves with butter and jam, or they can be stuffed with ice cream or chocolate to make a dessert, or with fish or meat to make an entree. The last time I was in Maine I bought a popover pan and popover mix, and today I finally attempted to make them.
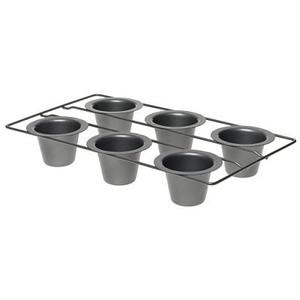


A popover pan is similar to a muffin pan, except the cups are a little deeper, and they are separated to give the popovers room to expand. In theory, popovers can be made in a muffin pan, but I highly recommend a popover pan if you've never made them before.


Making the batter was very easy. I mixed 2/3rds cup milk with one egg, and then folded in 2/3rd cup of the popover mix I bought. I don't believe the store-bought mix is essential; since the only ingredients in it are flour and salt. There were a few tips on the side of the popover mix that were very helpful, however.

First of all, the egg(s) should be at room temperature before you use them.
Second, you should use whole milk instead of skim or low-fat. This prevents the popovers from burning. I used skim because it was all I had, and the popovers did come out a little brown, so maybe next time I'll try to pick up some whole milk.
Third, you should chill the batter for 30 minutes before baking it.
Fourth, you should warm the popover pans in the oven for a few minutes before pouring the batter into them.

After chilling the batter, I preheated the oven to 450 degrees per the instructions on the mix, warmed the pans for a few minutes and filled each popover cup 1/3rd full. (The amount of mix I used made 4 popovers). The instructions said to cook the mix at 450 degrees for 25 minutes and then lower the temp to 350 and cook for an additional 5-10 minutes. However, after about 20-22 minutes at 450 my popovers had clearly popped and were looking nice and golden brown, so I took them out of the oven.

The fifth important thing to remember is not to open the oven door while baking! If you need to peek at them, use the oven light. The popovers will not rise correctly if you open the door.

My popovers turned out looking (and tasting!) absolutely delicious! The second picture shows the inside of the popover, nice and hollow! Definitely a successful experiment :)

Friday, October 16, 2009

Easy Vegetable Tempura

Tempura is one of my favorite things to order in Japanese restaurants, so I decided to finally attempt to make it at home.
I found a very easy recipe on-line, the 1-1-1 recipe. Mix together one cup of flour, one cup of (very cold!) water, and one egg. Dip any vegetables you like in it (I used one of my faves, asparagus) and fry in a frying pan with about one inch of oil in it. A small pan works best for this, because you can use less oil to achieve the same depth.


I'm not sure how I feel about this recipe. It was very easy and quick, came out looking pretty decent, and tasted fine...but not great. There was just something missing. Oh well I guess I will just have to experiment with more recipes...

Blondies!

In general, I prefer chocolate chip cookies to blondies, but this recipe looked yummy and I was feeling like switching things up, so I tried it out the other night.

8 tablespoons (1 stick) unsalted butter, melted, plus more for pan
1/3 cup granulated sugar
1/2 cup packed light-brown sugar
1 large egg
1 teaspoon pure vanilla extract
1 cup all-purpose flour
1 teaspoon salt
1 cup semi sweet chocolate chips

Mix butter and sugars in a large mixing bowl. Whisk in egg & vanilla. Add flour and salt, stir until moistened. Add half the chocolate chips. Spread evenly in a greased 8x8 pan, add remaining chocolate chips on top. Bake at 350 degrees for about 40 minutes, or until toothpick comes out clean. Makes 16.


Very easy and very tasty!

Thursday, October 15, 2009

Panini!

For my birthday this past May, I received a panini press and I just recently got around to trying it out!
I decided to make one of my favorite sandwiches, a chicken/avocado/mozzarella combination.
The sandwich was simple to make and took less than 5 minutes with the panini press.

Directions:
Take two slices of bread, butter one side of each slice. Plug in the panini press, put one slice of bread on the press, butter side down. Top with pieces of chicken (previously cooked in whatever style you prefer, I baked it), one half of an avocado sliced up, and a few pieces of fresh mozzarella. Place the other piece of bread on top, butter side up. Shut the lid on the panini press and grill for a few minutes or until golden brown.


The photo does not do it justice, but it was really yummy! Obviously the same thing can be achieved in a frying pan, but the panini press makes it so much quicker and easier. And warm sandwiches with nice melty cheese are always preferable to cold sandwiches :)

Thursday, October 1, 2009

Best Cheeseburger Ever!

One of my favorite places in the entire to world to get a cheeseburger is Shady Glen, a "dairy store"/diner in Manchester, CT. It's pretty well known and has been featured on the "Road Food" website (http://www.roadfood.com/Reviews/Overview.aspx?RefID=14). They rated it "worth planning a day around" and although I don't know if I would go that far, it's certainly worth a visit if you're driving through Connecticut on I-84.


The cheeseburger is made using 4 slices of american cheese layered over the cheeseburger. The cheese directly on top of the patty gets nice and melted, while the cheese that hangs over the edge of the patty comes in to direct contact with the gridle and gets fried, turning nice and crispy. If you're a huge fan of cheese like I am, it's a must-try!

Wednesday, September 30, 2009

Black Bean and Corn Salsa Pizza


I love Mexican food and pizza, so here is a happy compromise: home baked pizza (almost from scratch) in 20mins!

Ingredients (serves 2-3):

1 bag of pizza dough from Trader Joe's (wheat, plain, or garlic and herb...I am a fan of garlic and herb!)
7-10 stems of cilantro
3/4 of a 15oz can of black beans
1/2 cup of finely chopped bell peppers (any color)
1/2 cup of frozen sweet corn
1/2 cup of finely chopped onions
1/2 cup of finely chopped tomato
1/4 cup of finely chopped jalapenos
1 tsp of taco seasoning (or more to taste)
1/3 jar of spaghetti sauce
1 cup of grated cheese (cheddar, mozzarella, or Mexican)
A little bit of flour

Pull out the dough from the fridge 20 mins prior to baking.
Pre-heat your over to 450 degrees. And chop all the vegetables.
Thaw out (or microwave to thaw) the corn.
Lightly flour a 12'' circular baking sheet or a similar sized rectangular sheet.
Hand stretch (or roll) the dough out over the baking sheet.
Add a thin layer of spaghetti sauce (not really needed for flavor, but keeps the crust from being too dry).
Mix together all the vegetables with the taco seasoning, and add to the pizza.
Top with cheese.
Bake for ~10mins.
Cut and enjoy!

(I really like the Trader Joe's crusts for quick, cheap, delicious meals! They really can be topped with anything. We also made a veggie pizza with bell peppers, tomatoes, onions, and Italian spices. In the past, I have made pesto/sun dried tomato pizzas. They all come out great!)